 If you are a longtime WordPress.com blogger and now want to go on running your self-hosted blog then you have landed at the right place. Here, you will learn the easiest possible way to make the transition short & simple. Here, we will help you in following each step of this transition without making any big error.
Step 1 : First Buy Your Domain & Hosting
Before kick starting the transition process, you need to register a domain name for your WordPress.org blog. For example, if your wordpress.com blog name goes like this “abcd.wordpress.com” then you can simply buy a domain name “abcd.com or abcd.org” from Godaddy.com or bigrock.com (You are open to choose whichever domain name provider – these are famous ones). It is like naming your new blog for lifetime. Once you get the domain, you are up to buy the hosting package for your blog. There are several hosting packages available for WordPress.org. These packages differ in bandwidth & hosting space. If you are a video blogger then your blog will certainly require more space than that of a writer’s blog. Hence, hosting space matters. There is one more thing that you should keep in mind while buying the hosting space. Several hosting providers offer specific WordPress hosting services. You can consider them because that works smoothly for WP based sites.
Step 2 : Export Your Blog Data
In the first step, you need to export your old blog data from wordpress.com blog. It may sound tricky but it’s really easy in practice. You just need to login in your WP.com blog and navigate to dashboard.

Here, you need to click on ‘Tools’ button. It will get you a new sidebar menu. At the end of this sidebar menu, you will get the button ‘EXPORT’. Now, you carefully click on this button and wait for the next step.
 Clicking on Export button will take you to a new box with two distinct options to choose for exporting the data. These are Export and Guided Transfer. As you can see the above-mentioned image, guided transfer service is available at the cost of $129 so you can simply go with first option ‘Export’ that is also free of cost. Clicking on this link will lead you to a new box where you will be asked to select the stuff that you like to export. It will include all content, posts, pages, and feedback. You need to choose ‘All content’ if you want to transfer the whole WP.com blog. Now, just click on ‘Download Export File’.
Step 3 : Set up your WordPress.org Blog
Now, you need to login and navigate to your self-hosted blog’s dashboard. Here, you will get ‘Tools’ button. On clicking this button, you will get a new button called ‘Import – WordPressInstall the WordPress importer…’. Now, you need to install a WP importer plugin for going further.

Once you install the plugin, you will reach to the above-mentioned box. Here you will be asked to upload the exported file. As you can see, you can only upload a file that is 32MB at maximum but your file might be heavier than this. In this case, you will have to ask your hosting provider to increase your import limit temporarily.
Step 4 : Set your WordPress.com Blog to Private
In the fourth step, you need to set your wordpress.com blog as private. For doing so, you should navigate to ‘SETTINGS’ tab. Here, you will get ‘READING’. You should click here and navigate to ‘Site Visibility’ section. You can easily spot ‘I would like my blog to be private, visible only to users I choose’. You need to tick mark this option and hit the ‘save changes’ button.
Step 5 : Congratulations! You are done, Now Just redirect your site
Now, you are done with the transition process. You just need to bring your old users to new blog by site redirect. You are required to reach to your old blog’s dashboard and hit ‘Store’ button.
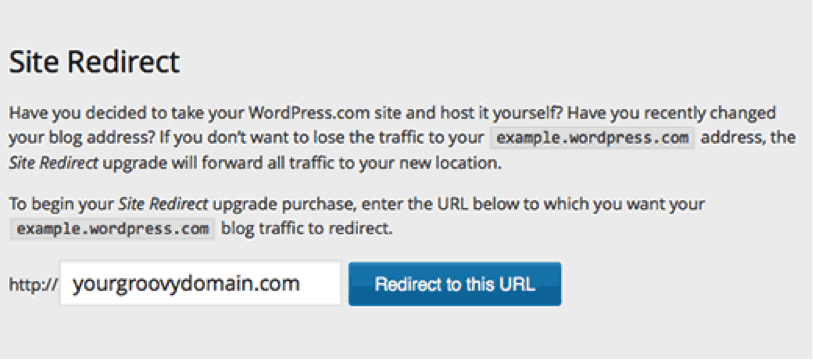
On clicking here, you will get a ‘SITE REDIRECT’ option. Now, just type the URL of your self-hosted blog in the blank box and hit ‘Redirect to this URL’.
This tutorial is capable in helping you to shift your WordPress.com powered blog to a self-hosted blog. On your new blog, you can make custom changes, use primary WP themes and install SEO friendly plugins. All you need to do is to take each step carefully. In case, you lack the basic know-how of WordPress dashboard then you should prefer seeking assistance of a seasoned WP blogger.
About The Author:
Elvin Roy is a senior WordPress developer for Wordsuccor – a custom WordPress development company. This company delivers most comprehensive wordpress development solutions for different industry verticals? Join us on Twitter to get the latest reviews and updates.